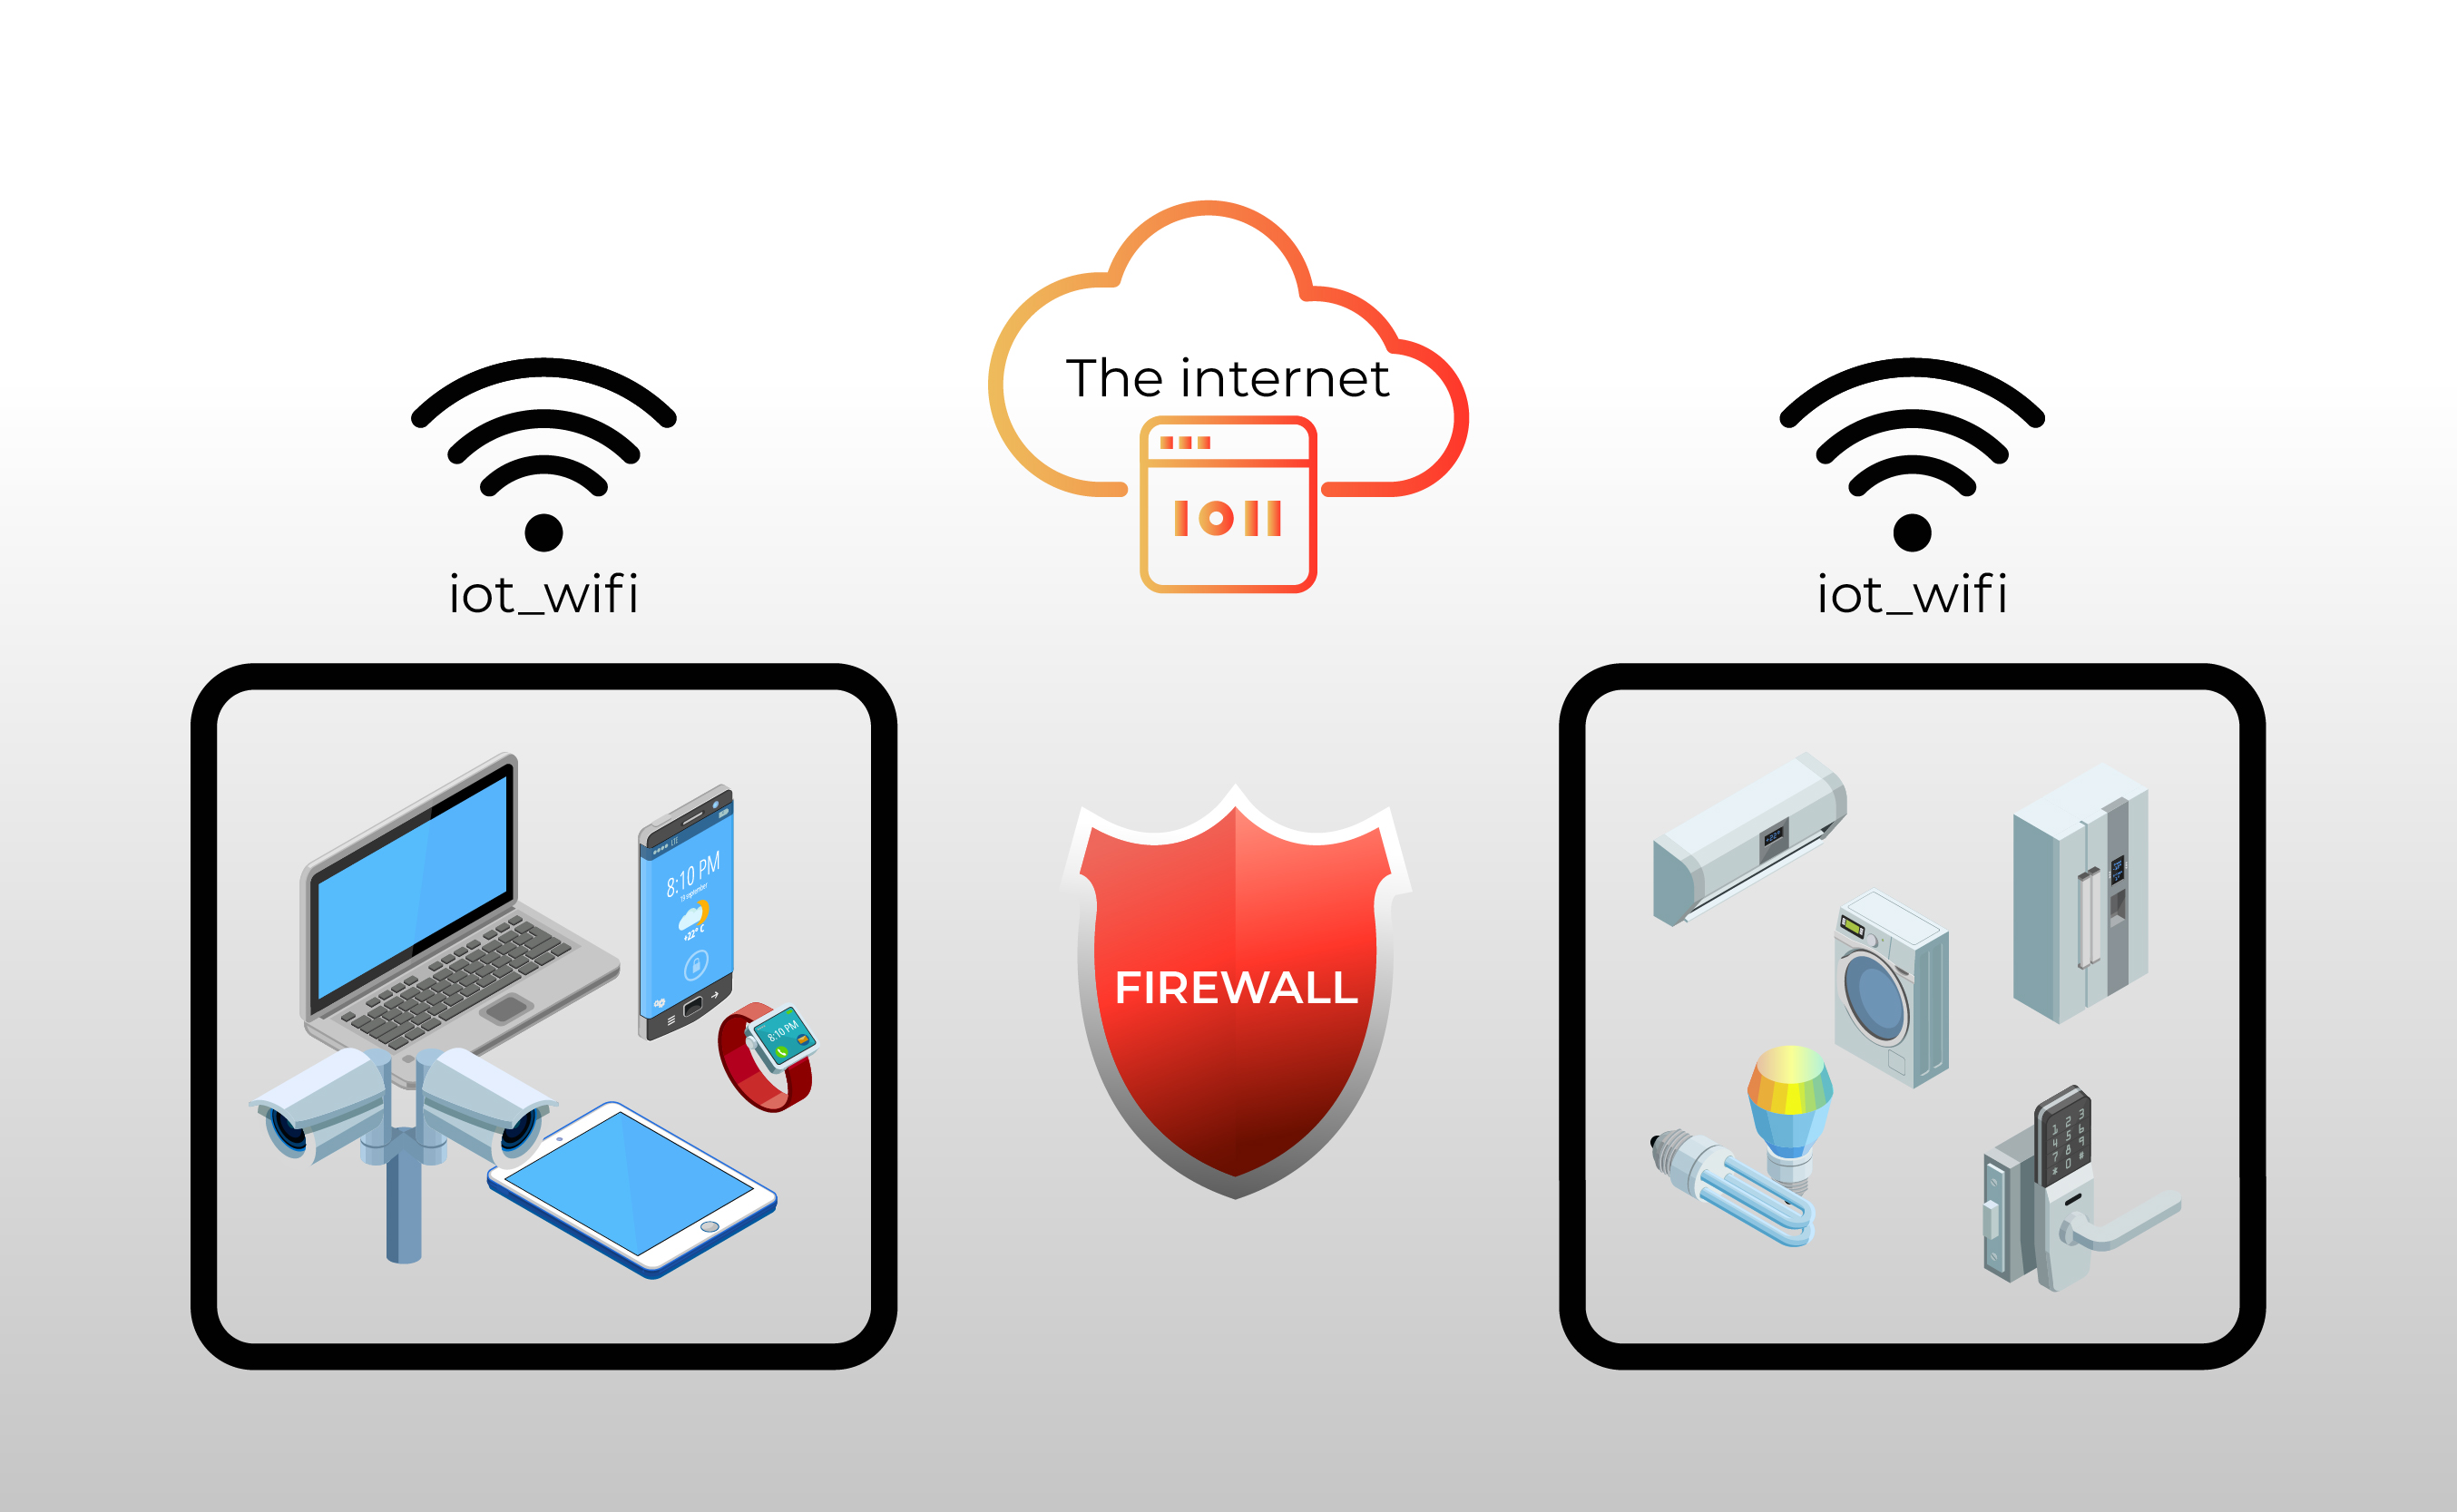
Have you ever tried to get your smart home gadgets or other internet-connected bits to talk to the outside world, only to find them stuck behind your Mac's digital bouncer, the firewall? It's a common head-scratcher, really, trying to make your cool IoT device connect behind that firewall on your Mac without spending a dime. You want your smart lights to respond when you're away, or maybe your security camera to send alerts, but that protective barrier feels like a big, solid wall. It can feel a bit like your devices are speaking a secret language that your network just isn't letting through, you know?
Many folks run into this very thing. Your Mac, bless its heart, is pretty good at keeping things safe, which means it often keeps things out that you actually want in. This can be particularly true for those little internet of things gadgets that often need a clear path to do their thing. The idea of getting your IoT device to connect behind a firewall on your Mac, and doing it for free, might sound like a bit of a tall order, but it’s more doable than you might think. There are ways to gently coax your network into letting your devices communicate, and we’re going to look at some of those right here.
It’s about making sure your smart stuff can chat with its servers or with you, no matter where you are, all while keeping your home network generally secure. We’ll explore some straightforward approaches and simple methods that help you get your IoT device to connect behind that firewall on your Mac, and yes, we'll keep it budget-friendly. So, if you’ve been scratching your head, wondering how to bridge that gap between your helpful gadgets and the broader internet, you’re definitely in the right spot.
- Declan James Mcmahon Stats
- T%C3%BCrk If%C5%9Fa Sofwe
- Pining For Kim By Trailblazer Free
- Aravind Srinivas Parents
- Delilah Distefano
Table of Contents
- What Is a Firewall Anyway, and Why Does It Block My IoT Devices?
- Can You Really Connect IoT Device Behind Firewall Mac Free - What's the Deal?
- Getting Your IoT Gadgets to Talk - A Simple Way to Connect IoT Device Behind Firewall Mac Free
- Why Does My Mac Make It Tricky to Connect IoT Device Behind Firewall Mac Free?
- Helpful Tools and Clever Tricks to Connect IoT Device Behind Firewall Mac Free
- Is There a Safe Way to Connect IoT Device Behind Firewall Mac Free?
- A Few Steps to Connect IoT Device Behind Firewall Mac Free
- What if I Still Can't Connect IoT Device Behind Firewall Mac Free?
What Is a Firewall Anyway, and Why Does It Block My IoT Devices?
Think of a firewall as a very watchful security guard for your home network. Its main job is to check all the digital traffic trying to come into or leave your network, deciding what gets through and what gets stopped. It’s there to keep bad stuff out, like unwanted visitors or harmful software, and to keep your private information safe inside. So, when you’re trying to connect an IoT device behind that firewall on your Mac, it's often the firewall doing its job a little too well, in a way.
These guards, whether they are part of your internet router or built right into your Mac's operating system, look at where digital messages are coming from and where they want to go. If a message doesn't fit the rules, or if it looks suspicious, the firewall just blocks it. This is really good for general safety, but for your IoT gadgets, which often need to send and receive specific kinds of data to function properly, it can be a bit of a hindrance. They might be trying to talk on a particular "port" or use a certain kind of "protocol" that the firewall isn't set up to allow by default. That's why getting your IoT device to connect behind a firewall on your Mac can sometimes feel like a puzzle.
The reason your IoT devices often get blocked is pretty simple: they are, by their nature, always trying to communicate with servers out on the internet, or sometimes with other devices in your home. These little gadgets might not be using standard communication methods, or they might be trying to open connections that the firewall sees as unusual. Since firewalls are designed to be cautious, they often err on the side of caution and simply prevent these connections. It’s not that your firewall hates your smart lights, it’s just trying to be a good protector. So, we need to teach it which of these "unusual" connections are actually perfectly fine for your IoT device to connect behind the firewall on your Mac.
Can You Really Connect IoT Device Behind Firewall Mac Free - What's the Deal?
It’s a fair question to ask if you can truly get your IoT device to connect behind a firewall on your Mac for no cost at all. And the answer, generally speaking, is yes, you absolutely can. Most of the methods we'll talk about involve changing settings on your router or on your Mac itself, which doesn't cost anything but a little bit of your time and attention. You won't need to buy special software or subscribe to a service just to make your smart plug work. This is pretty good news, really, because nobody wants extra bills just to automate their curtains.
The "free" part comes from using tools that are already built into your network equipment or your Mac, or by using open-source software that community developers have made available for everyone. These tools let you adjust how your network traffic flows, helping your IoT device connect behind that firewall on your Mac. There isn't really a hidden catch, as such, but there's a small bit of effort involved in learning where these settings are and what they do. It’s a bit like learning to drive; you don’t pay for the road, but you do need to learn how to use the car. So, while it might take a moment to set up, the actual process of getting your IoT device to connect behind a firewall on your Mac is indeed free of charge.
Sometimes, people wonder if "free" means "less secure." That's a valid thought. However, with the right approach and a little bit of careful setup, you can make these connections safely. It’s all about understanding what you're doing and not just blindly clicking buttons. We’ll talk about how to keep things safe while still allowing your IoT device to connect behind that firewall on your Mac. The goal is to open just enough of a pathway for your gadgets to work, without leaving your whole network wide open for anything to come in. It’s about finding that sweet spot between convenience and keeping your digital home secure.
Getting Your IoT Gadgets to Talk - A Simple Way to Connect IoT Device Behind Firewall Mac Free
To get your IoT devices chatting with the outside world, you often need to tell your router to make an exception for them. One common way to do this is called "port forwarding." Think of your router as a big apartment building, and each "port" is like a specific apartment number. When your IoT device needs to receive a message from the internet, it's like someone sending mail to a particular apartment. By default, the mailroom (your firewall) might just send all unknown mail back. Port forwarding tells the mailroom, "Hey, if mail comes for apartment 80, send it straight to this specific device inside." This helps your IoT device connect behind that firewall on your Mac, because it creates a direct path for the necessary communication.
Another method you might come across is called UPnP, or Universal Plug and Play. This is like your router having a very friendly concierge who automatically helps new devices find their way to the right "apartment" and tells the mailroom to expect mail for them. Many IoT devices try to use UPnP to set up their own port forwarding automatically. It’s very convenient, as it means less work for you. However, some people prefer not to use UPnP because, while it makes things easy, it also means your devices are making changes to your router's settings without your direct approval for each one. This can be a bit of a trade-off between ease of use and having full control over every little detail when you want to connect an IoT device behind a firewall on your Mac.
Then there's something called a DMZ, or Demilitarized Zone. This is a bit more drastic. Imagine setting up a separate, less protected area of your network where you put a device. Any device in the DMZ is basically outside the main firewall's protection, meaning all incoming traffic is allowed to reach it. While this will definitely let your IoT device connect behind a firewall on your Mac, it’s generally not recommended for most home users because it exposes that device to much greater risk. It’s like putting your valuable items outside your front door with no lock. You might use it for very specific, temporary situations, but for everyday IoT use, it’s usually not the best plan for keeping things safe and sound.
Why Does My Mac Make It Tricky to Connect IoT Device Behind Firewall Mac Free?
Your Mac is built with a strong focus on keeping you safe and your information private. This is a very good thing, of course. However, this inherent carefulness can sometimes make it seem a little difficult when you're trying to get an IoT device to connect behind a firewall on your Mac. macOS has its own built-in firewall, which works alongside your router's firewall. This means there are two layers of protection, which is great for security, but it also means there are two places where a connection might be stopped. It’s like having two security guards at the door, both needing to give their approval.
The Mac's firewall typically blocks incoming connections that aren't specifically allowed. This is its default setting to prevent unwanted access to your computer. For many common applications, macOS will ask you if you want to allow a connection, or it might already have rules for well-known services. But for a new, perhaps less common, IoT device, your Mac might not know what to do with the incoming data, and so it simply blocks it. This is why you might need to adjust your Mac's network preferences, giving specific permission for your IoT device to connect behind that firewall on your Mac, allowing it to talk freely.
Furthermore, how macOS handles network connections can be a bit different from other operating systems. It prioritizes user privacy and system stability, which can sometimes translate into more restrictive default network settings. This isn't a flaw, but rather a design choice. It just means that when you’re trying to set up something like an IoT device that needs to communicate freely, you might need to manually tell your Mac that this particular type of communication is okay. So, it's not that your Mac is trying to be difficult, it's just being very careful, and we need to show it how to make an exception for your IoT device to connect behind a firewall on your Mac.
Helpful Tools and Clever Tricks to Connect IoT Device Behind Firewall Mac Free
When you're working on a Mac, one very popular tool for adding more capabilities is something called Homebrew. It’s like a package manager for macOS, letting you easily install command-line tools that Apple doesn't include by default. For example, if you need a specific network utility or a small proxy server to help your IoT device connect behind a firewall on your Mac, Homebrew can often fetch and install it for you with just a simple command. It’s a very handy resource for anyone who likes to tinker a bit under the hood of their computer, making it easier to manage different software bits.
Beyond Homebrew, there are various open-source software options that can come in handy. While we won't get into specific names here, you might look into tools that create virtual private networks (VPNs) or simple proxy servers on your Mac. These kinds of programs can sometimes create a secure tunnel through your firewall, allowing your IoT device to send its data out and receive data back without directly exposing it. It's like building a special, private lane on a busy highway. These tools can be a little more involved to set up, but they offer flexibility and often a higher degree of control over how your IoT device connects behind a firewall on your Mac.
However, the most common "trick" involves your router's settings. Every home router has a web-based interface that you can access through your web browser, usually by typing an IP address like 192.168.1.1 or 192.168.0.1 into the address bar. This is where you can find settings for port forwarding, UPnP, and sometimes even a DMZ. You'll need your router's username and password (often found on a sticker on the router itself, or in its manual). Learning to navigate these settings is key to getting your IoT device to connect behind that firewall on your Mac, as it's often the first place you'll need to make adjustments to allow specific traffic through. It’s a little like learning to adjust the knobs on a stereo to get the sound just right.
Is There a Safe Way to Connect IoT Device Behind Firewall Mac Free?
Safety is a big concern, especially when you're talking about opening up parts of your network. The good news is that yes, there are definitely ways to help your IoT device connect behind a firewall on your Mac while still keeping things pretty secure. The main thing is to be thoughtful about what you’re doing. For instance, if you use port forwarding, only open the exact ports that your IoT device needs, and nothing more. It’s like only unlocking the specific door your visitor needs to use, rather than leaving all the doors wide open. This reduces the chances of unwanted guests getting in, which is pretty important for your peace of mind.
Using something like a Virtual Private Network (VPN) can also add a layer of security. While setting up a VPN client on your Mac might be a bit more involved, it creates a private, encrypted tunnel for your data. This means even if your IoT device's traffic leaves your home network, it's scrambled and protected. Some advanced IoT setups even allow devices to connect directly to a VPN, further securing their communications. This approach helps your IoT device connect behind a firewall on your Mac by creating a very safe pathway, almost like a secret handshake that only your device and its server know.
Beyond specific network configurations, general good security practices are really important. Always use strong, unique passwords for your router, your IoT devices, and your Mac. Don't use easy-to-guess words or common number sequences. Also, make sure all your device software and firmware (the internal programming) are kept up to date. Software updates often include security fixes that patch up any weaknesses. By combining smart network adjustments with these basic but very effective habits, you can help your IoT device connect behind a firewall on your Mac in a way that feels pretty safe and sound.
A Few Steps to Connect IoT Device Behind Firewall Mac Free
Getting your IoT device to connect behind a firewall on your Mac usually starts with figuring out what your device actually needs. Check the instructions or support pages for your specific IoT gadget. It might tell you which "ports" it uses to communicate or if it relies on something like UPnP. Knowing this information is the first and perhaps most important step, as it tells you exactly what kind of opening you need to create in your network's defenses. Without this piece of the puzzle, you're just guessing, and that can be a bit frustrating, to say the least.
Next, you’ll typically need to log into your home router's settings. As mentioned earlier, this usually involves typing an IP address into your web browser. Once you're in, look for sections related to "Port Forwarding," "NAT," "Firewall," or "Security." The names can vary a bit depending on your router's brand, but they generally refer to the same kinds of controls. This is where you'll create the specific rules that allow your IoT device to connect behind that firewall on your Mac. You'll likely need to enter the device's internal network address (its IP address) and the port numbers it needs to use. It’s like telling your router, "This particular device, at this specific address, needs to use these specific doors."
After adjusting your router, you might also need to check your Mac's own firewall settings. Go to System Settings (or System Preferences on older macOS versions), then look for "Network" or "Security & Privacy," and then "Firewall." Make sure that your Mac's firewall isn't blocking the specific application or service related to your IoT device. Sometimes, if the IoT device has a companion app on your Mac, you might need to explicitly allow that app to receive incoming connections. This double-check ensures that both layers of your network's protection are on the same page, helping your IoT device connect behind that firewall on your Mac without any unnecessary hiccups.
What if I Still Can't Connect IoT Device Behind Firewall Mac Free?
If you've tried these steps and your IoT device still isn't talking, don't worry, it happens. One common thing to do is to simply restart your router and your IoT device. Sometimes, a fresh start can clear up little network glitches. It’s like giving everything a quick reset button press, allowing them to re-establish their connections. This simple act can often fix issues where your IoT device is struggling to connect behind that firewall on your Mac, as it forces the devices to re-read their settings and try again.
Another helpful step is to check the support pages or user forums for your specific IoT device. Other people might have faced the exact same problem and found a solution. These communities are often full of helpful advice and specific troubleshooting tips that apply to your exact model of gadget. They might even have very detailed instructions on how to configure your router or Mac for that particular device. This can be a real time-saver when you're trying to figure out how to get your IoT device to connect behind a firewall on your Mac, as someone else might have already done the legwork.
Finally, sometimes the issue isn't with the firewall at all, but with the device itself or its connection to your Wi-Fi. Double-check that your IoT device is actually connected to your home network. You might also look at your router's logs, if it has that feature. These logs can sometimes show you if connections are being blocked and why, giving you a clearer picture of what’s going on. This kind of detective work can be very useful for pinpointing the exact reason your IoT device isn't able to connect behind that firewall on your Mac, helping you find the right solution.
This article has walked through the idea of getting your IoT devices to talk, even when they're behind your Mac's protective firewall, and doing it without spending money. We talked about what firewalls do and why they might block your gadgets. We also looked at how you can use things like port forwarding or even UPnP to create pathways for your devices. We touched on why Macs can be a bit particular with network settings and explored some free tools and router adjustments that can help. We also made sure to cover how to keep things safe while opening these connections and gave you some general steps to follow. Finally, we went over what to do if your devices are still being a bit stubborn about connecting.