Have you ever thought about keeping tabs on things far away, perhaps with a small computer like a Raspberry Pi, and wanted to make sure it was truly private and safe? Many people find themselves in a spot where they need to reach their little devices from a distance, maybe to check on sensors or to send new instructions. It can feel a bit like trying to talk to someone across a very busy room, where you want your message to be heard only by them and no one else. This kind of remote interaction is something many folks are looking for these days, especially with more gadgets popping up everywhere.
Connecting small, special-purpose computers, sometimes called "things" in the world of the internet, to a big cloud service like Amazon Web Services, or AWS, brings up some interesting points about security and how you reach them. You want a way to get to your Raspberry Pi, maybe sitting in your garage or a garden shed, without opening it up to everyone on the internet. This is where ideas like a Virtual Private Cloud, or VPC, and a secure shell, known as SSH, come into play. They help you set up a direct, shielded line of communication, so you can chat with your Raspberry Pi as if it were right next to you, even if it's miles away, you know?
This discussion will walk you through how to link up your Raspberry Pi with AWS, making use of a VPC and SSH for a truly private connection. We will look at a practical RemoteIoT VPC SSH Raspberry Pi AWS example, showing how these pieces fit together. You will get a clearer picture of how to manage your distant gadgets with a good measure of protection, giving you peace of mind about your digital setup, that is.
- Nutrients In Bamboo Shoots
- Nene Leakes Birthday
- Manage Remote Iot Examples
- Jacqui Heinrich Husband Name
- Iot Remote Management Examples
Table of Contents
- Why Connect Your Raspberry Pi to AWS for Remote IoT?
- Getting Your Raspberry Pi Ready for RemoteIoT
- How Does SSH Secure Your Raspberry Pi Access?
- Setting Up SSH for Your Raspberry Pi with AWS
- What's a VPC and Why Use It for RemoteIoT?
- Building Your AWS VPC for Secure Remote Access
- Can We See a RemoteIoT VPC SSH Raspberry Pi AWS Example in Action?
- A Practical RemoteIoT VPC SSH Raspberry Pi AWS Example
Why Connect Your Raspberry Pi to AWS for Remote IoT?
You might be asking yourself, why bother linking a little Raspberry Pi, which is quite a modest computer, to something as big as Amazon Web Services? Well, a Raspberry Pi is a fantastic little machine for collecting bits of information from its surroundings, like temperature readings or movement. It can also control small parts of the real world, turning lights on or off, for instance. But what if your Raspberry Pi is in a faraway spot, like a remote weather station, or a home security camera system that needs to send pictures back to you? You need a reliable way to get that information and perhaps even give it new instructions. AWS, in a way, offers a big, strong home for your data and a control center for your devices.
AWS gives you a lot of tools that a single Raspberry Pi just can't offer on its own. Think about storing loads of data over a long period, or having a place where many Raspberry Pis can send their information at once. AWS can handle these tasks with ease. It also lets you build more complex systems around your simple devices, like setting up alerts if a certain temperature is reached, or processing pictures to spot things of interest. So, connecting your Raspberry Pi to AWS helps your RemoteIoT setup grow and become more capable, giving you more options, too it's almost.
This connection means your small device can be part of a much larger system, letting you manage and use the information it gathers in powerful ways. It's about taking a modest gadget and giving it a bigger voice, so to speak. This combination helps bring your ideas for remote sensing and control to life in a way that is both powerful and, with the right steps, quite private. This is where the RemoteIoT part of our discussion really starts to shine, you know.
Getting Your Raspberry Pi Ready for RemoteIoT
Before your Raspberry Pi can chat with AWS, it needs a little bit of preparation. First, you will want to make sure your Raspberry Pi has its operating system all set up. Most people use Raspberry Pi OS, which is a good choice. You will need to get it connected to the internet, either through a cable or Wi-Fi, depending on where it will live. This basic network link is the first step for any RemoteIoT device.
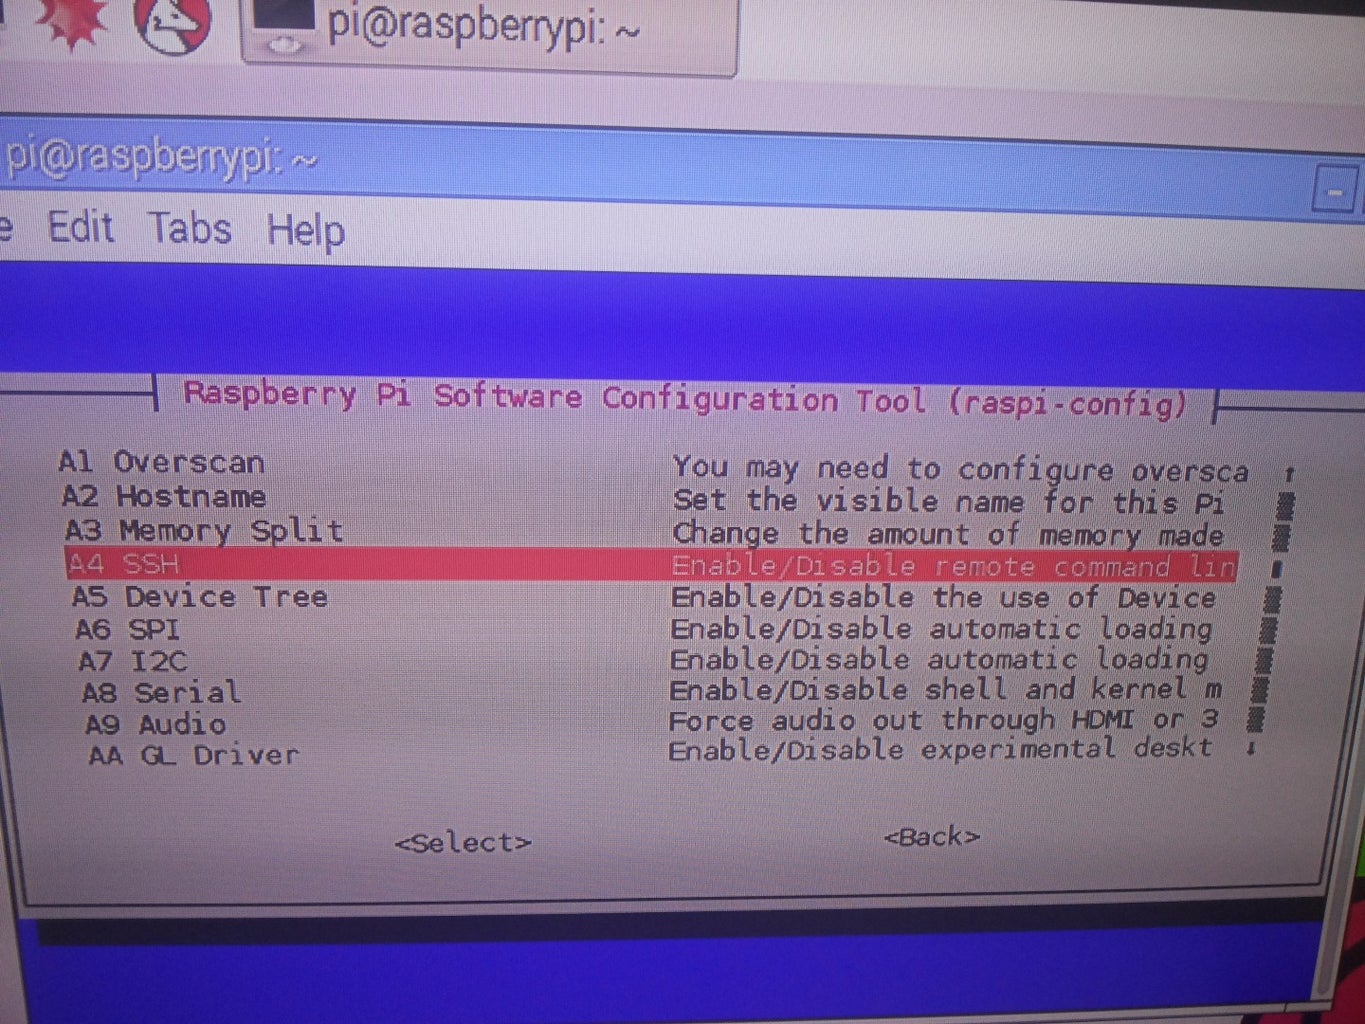
Next, it is a good idea to update all the software on your Raspberry Pi. This makes sure everything is fresh and ready to go. You do this with a couple of simple commands in the terminal, which is like a text-based way to tell your computer what to do. After that, you will want to make sure the SSH feature is turned on. SSH lets you connect to your Raspberry Pi from another computer using a secure channel, which is super important for our plan. You can usually turn this on through the Raspberry Pi configuration tool, which is a fairly straightforward process, actually.
Having your Raspberry Pi ready means it can listen for incoming connections and send out information. It's like getting a new phone and making sure it can make calls and send messages. For a RemoteIoT project, this initial setup is quite important. It lays the groundwork for linking it up with a bigger system like AWS, helping you with your remoteiot vpc ssh raspberry pi aws example, you see.
How Does SSH Secure Your Raspberry Pi Access?
When you want to reach your Raspberry Pi from afar, you need a way to make sure no one else can listen in or pretend to be you. This is where SSH, or Secure Shell, comes in handy. Think of SSH as a very private, encrypted tunnel between your computer and your Raspberry Pi. When you send commands or information through this tunnel, it is all scrambled up so that anyone trying to snoop would just see gibberish. This keeps your communication safe from prying eyes, which is very important for any remote system, you know?
SSH uses special keys, not just passwords, to prove who you are. You have one key on your own computer, and a matching key on your Raspberry Pi. When you try to connect, these keys talk to each other to confirm it is really you. This method is much safer than just using a password, which someone might guess. It makes it very difficult for someone who shouldn't be there to get into your Raspberry Pi, protecting your RemoteIoT setup, so.
By using SSH, you create a trusted pathway. It means you can send instructions to your Raspberry Pi, or pull information from it, with a good feeling of safety. This secure way of getting into your device is a fundamental part of managing any distant computer, especially for something as exposed to the outside world as a Raspberry Pi in a remote spot. It is a critical piece of the puzzle for a secure remoteiot vpc ssh raspberry pi aws example, you see.
Setting Up SSH for Your Raspberry Pi with AWS
To get SSH working well with your AWS setup, you will typically use what is called a "key pair." This is simply two long strings of characters that go together. One part, the private key, stays on your personal computer, and you guard it carefully. The other part, the public key, gets placed on your Raspberry Pi. When you try to connect, your computer sends a request, and the Raspberry Pi checks if your public key matches the private key you are using. If they line up, access is granted, which is pretty neat, in a way.
For our AWS connection, we will often use an EC2 instance, which is like a virtual computer running in the AWS cloud, as a sort of middleman. You would first connect to this EC2 instance using SSH, and then from that EC2 instance, you would connect to your Raspberry Pi, also using SSH. This creates a double layer of security and keeps your Raspberry Pi from needing a direct public internet address, which is a good thing for safety. This method is often called a "jump box" or "bastion host" setup, and it is a common way to handle secure remote access, you know.
The steps involve creating your key pair, putting the public part on your Raspberry Pi, and then making sure your EC2 instance in AWS can also use SSH to talk to your Pi. This chain of secure connections means your Raspberry Pi is tucked away behind AWS, making it much harder for unwanted visitors to find or get into it. It's a smart way to manage your remoteiot vpc ssh raspberry pi aws example, providing a shield for your device, basically.
What's a VPC and Why Use It for RemoteIoT?
A Virtual Private Cloud, or VPC, in AWS is like having your own isolated section of the internet inside AWS. Think of it as building a private, fenced-off area within a very large park. Only things you put inside your fence can talk to each other directly, and you control who can come in or go out. This is a big deal for security because it means your Raspberry Pi, even if it is connected to AWS, is not just floating out there on the wide-open internet. It is in its own special, private network space, which is very helpful, really.
Using a VPC for your RemoteIoT setup means you can decide exactly which parts of your AWS system can talk to your Raspberry Pi, and under what conditions. You can set up specific rules, like only allowing SSH connections from certain computers, or only allowing your Raspberry Pi to send data to a particular storage service within your VPC. This fine-grained control helps keep your data and devices much safer than if they were exposed directly to the public internet. It gives you a good feeling of command over your network connections, you know.
Without a VPC, your devices might be more open to unwanted attention. With it, you get a protective barrier that helps guard your system. It is a core part of building a truly secure setup for your distant devices. This private network space is a key element in making your remoteiot vpc ssh raspberry pi aws example work with a good level of privacy and protection, that is.
Building Your AWS VPC for Secure Remote Access
Creating your own VPC in AWS involves a few steps, but it is quite straightforward once you get the hang of it. You will start by defining a range of IP addresses for your private network. These are like unique phone numbers for each device inside your VPC. Then, you set up subnets, which are smaller sections within your VPC. You might have one subnet for things that need to talk to the internet, and another for things that should stay completely private, which is a good idea, in some respects.
You will also need to put in place what AWS calls "security groups" and "network access control lists." These are like bouncers and gatekeepers for your VPC. Security groups control traffic at the individual device level, deciding which connections are allowed in or out of your EC2 instance or other services. Network access control lists work at the subnet level, providing another layer of rules for incoming and outgoing data. These layers of control are very important for keeping your remote access secure, you know.
Once your VPC is set up with its subnets and security rules, you can then place your AWS resources, like your EC2 jump box, inside it. This means your jump box is protected by your custom network rules, and it acts as the only way into your private network from the outside world. This structure is a solid way to manage access for your remoteiot vpc ssh raspberry pi aws example, making sure your devices are well-shielded, really.
Can We See a RemoteIoT VPC SSH Raspberry Pi AWS Example in Action?
Putting all these pieces together for a practical remoteiot vpc ssh raspberry pi aws example shows how they work as a whole. Imagine you have a Raspberry Pi collecting sensor data in a greenhouse. You want to check on it from your home computer. Instead of giving your Raspberry Pi a public address on the internet, which can be risky, you connect it to your home network, and it then has an outgoing connection to AWS. This connection is not direct inbound access, but rather the Raspberry Pi initiating a connection to a specific, protected service within your AWS VPC, like a secure proxy or an IoT endpoint. This way, your Pi does not need to be directly exposed to the internet at all, which is a bit safer.
From your home computer, you would first connect via SSH to an EC2 instance that you have set up inside your AWS VPC. This EC2 instance acts as your secure entry point. Because this EC2 instance is inside your private AWS network, it can then securely connect to your Raspberry Pi, which is also linked into that same private network (perhaps through a VPN connection that the Pi initiates to the VPC, or through an AWS IoT service that acts as a proxy). This two-step connection means your Raspberry Pi is never directly reachable from the open internet, only through your trusted AWS setup, which is pretty good, you know.
This method gives you a strong sense of control and safety. You can send commands to your Raspberry Pi, collect its data, and manage it, all while knowing that the connection is private and protected. It is a way to bridge the gap between your physical devices and the vast resources of the cloud, making distant management feel close and secure. This is a common pattern for keeping remote IoT devices private and manageable, giving you peace of mind, so.
A Practical RemoteIoT VPC SSH Raspberry Pi AWS Example
Let us walk through a very simple remoteiot vpc ssh raspberry pi aws example. First, you would set up your Raspberry Pi with its operating system and make sure SSH is on. You would also create an SSH key pair, putting the public part on your Raspberry Pi. Next, in AWS, you would create a VPC with at least one public subnet and one private subnet. In the public subnet, you would launch an EC2 instance, which will be your jump box. This EC2 instance will have a public IP address so you can reach it from your home computer using SSH and your private key.
Now, for the Raspberry Pi to talk to the private subnet in your VPC, you would set up a VPN connection from the Raspberry Pi to a VPN server or client running within your VPC. This VPN connection creates a secure tunnel from your Raspberry Pi's location directly into your private AWS network. Once this VPN tunnel is active, your Raspberry Pi will have a private IP address within your VPC's private subnet. This means your EC2 jump box, which is also in the VPC, can now talk directly to your Raspberry Pi using its private IP address and the SSH key pair you set up earlier, which is actually quite clever.
So, to access your Raspberry Pi, you would first SSH into your EC2 jump box from your home computer. Once you are on the jump box, you would then SSH again from the jump box to your Raspberry Pi's private IP address within the VPC. This two-hop connection keeps your Raspberry Pi hidden from the open internet, allowing you to manage it securely from anywhere. This approach is a strong way to handle remote devices, giving you a safe and controlled pathway for your remoteiot vpc ssh raspberry pi aws example, you know.
- Mia Z Viral Video
- Josiah Queen Net Worth
- T%C3%BCrk Ifla Sotwe
- How To Remotely Connect To Raspberry Pi From Mac
- Sophie Rain Age